Bent Latch?

posted by Frank at 4:05 PM
1 comments
![]()
Converting a 1969 Volkswagen Fastback to Electric Power
I received my Canadian Electric Vehicles adaptor kit from EV Parts a week ago and test fit it to my motor and transaxle.


It fits great, and the build quality is excellent. The only missing piece is a block-off plate for the starter. Now I just need to figure out which of the four orientations is best for the electrical connections on the motor.
posted by Frank at 11:25 PM
0 comments
![]()
Editor’s Note: For those of you who just stumbled onto this post, I’m referring to a Type 3 that’s been converted to run on a big pack of batteries rather than the standard engine. Your average alternator isn’t going to be able to supply enough power (particularly voltage) to run the system described below, and you’d be wasting the perfectly good heat that comes off the exhaust system of your engine.
Most of the commercial heater replacements that are out there for conversion EVs are designed for use with formerly water-cooled vehicles. As such they’re designed to fit in the place of the original heater core (which looks like a small automotive radiator about the size of a stack of half a dozen CD cases), or to heat a liquid that’s circulated through the stock heater core. In either case, they’re not cheap.
Because our Type 3s were air-cooled, they used a different way to capture the engine’s waste heat, namely by circulating the heating air and hot engine exhaust through a heat exchanger. From inside the passenger compartment you were basically looking at a 2.5” diameter pipe under each side of the rear seat blowing hot air in. To combat the noise problem, VW installed a muffler on each tube that was basically a plastic bellows with a mesh tube inside, with batting between the tube and the plastic. These mufflers also split the flow of hot air between the rear- and front seat vents.
To replicate this situation, we need both a steady stream of air and a way of heating it. To provide the former, I’ll be using a second-hand heater blower from a ‘75-‘79 VW Bus. It has two outlets that will be connected under the trunk to where the original heat exchangers were connected. (If you’re having trouble finding one of these, you could also consider this kit, designed as a booster for the stock heating system in a VW Beetle or Ghia).
I’ll heat that air with a couple of ceramic heating elements much like the one I linked to above. Except that we’re going to get our heaters at Target for less than $20 a pop. These heaters have a nice simple thermostat in them as well, which we’ll use to automagically turn the heater on and off at a comfortable interior temperature.
The guts of these heaters will go inside the plastic muffler thingies under the rear seat, once we remove their original guts.
Here’s the step-by-step:
Go down to Target (or over to their website at the link above) and pick up a couple of “Warm Fusion” (get it?) ceramic space heaters. The reason we want ceramic heaters is that they have an inherent positive temperature coefficient, which is a fancy way of saying that once they reach a certain temperature (around 180 degrees) they choke off the current flowing through them until the temperature drops back down. So they never get red hot the way some electric heaters do. They also have a size and shape that lend them to mounting inside the bellows.

Open the heaters by removing the five short screws that hold the front to the back. Then remove the four long screws that hold the black guts in place. The five wires connected to the metal core are standard quick-connects surrounded by little fiberglass braids, so just slide back the braids and pull them off. Pry off both knobs, and unscrew the thermostat from the plastic case. Finally snip off the wires going to the little thermal switch attached to the guts, leaving as much wire as possible attached to the switch.

Pick up a set of eight #8 by 1.5” machine screws with nuts and lock washers. Use them to affix the little mounting ears that fell off in the middle of step 2 back onto the guts so as to hold the metal core firmly in its plastic carrier.
Now go to your car and remove the heater mufflers from under the rear seat. This is done simply by compressing them enough to slip them off of the tubes they’re connected to.
Eviscerate these mufflers. They snap apart, and then it’s dead simple to pull out the original guts. While you’re doing this, note that they are worth something like $375 each at a certain online retailer. Tell yourself that those must be N.O.S. parts.
Take the new guts and place them round-end-first into the forward half of each muffler housing. This will require a bit of force, since you want to get the little “ears” surrounding the screw holes into the second groove of the housing. In fact, you will probably need to shave some material off of these ears to get the thing to fit. You should end up with the front of the heater housing roughly flush with the front of the muffler housing. Orient the connections so that they point towards the branch tube that goes to the rear seat vents.

Wire up the heater cores as shown in the diagram, and route the cables through a hole in one of the muffler halves.
Now just snap the back of each muffler housing back on, and put it back under the rear seat.
To mount the thermostat, drill the appropriate holes at the location shown here (from the Eberspächer Auxilliary Heater installation instructions). Your type 3 may look slightly different depending on it’s vintage, but you get the idea. You’ll need to drill three holes in total (one for the knob and two for the mounting screws).
Now wire one terminal of the thermostat to a wire that’s hot when the ignition is on. Connect a wire to the other terminal and run it back to power the fan as well as the relay that powers the heater cores.
Now whenever the ignition is on and the temperature is below the thermostat’s set-point, the heater will come on. For further control, you can hook the old “heater on” lever to a microswitch and put it in series with the thermostat. But to my mind that sounds like that will just confuse people.
Please note that I have yet to test this out, and it’s entirely possible that stuff will melt. I will post an update once I’ve stress tested this setup a bit.
posted by Frank at 7:06 PM
0 comments
![]()
One of the modifications I'm making to the car is to replace all of the red and amber lamps with LEDs. Here is a list of the bulbs and their power consumption:
| Location | Bulb | Qty. | Incandescent Power | (Peak/Typ.)LED Power (Peak/Typ.) |
||
|---|---|---|---|---|---|---|
| Peak | Typical | Peak | Typical | |||
| Headlights | H4* | 2 | 60W | 55W | N/A | |
| Front Parking/Turn Signals | 1157 | 2 | 21W | 5W | 3W | 0.4W |
| Brake Lights | 1156 | 2 | 21W | 0W | 3W | 0W |
| Rear Turn SIgnals | 1156 | 2 | 21W | 0W | 3W | 0W |
| Tail Lights | 67 | 2 | 5W | 5W | 1W | 1W |
| Total Wattage: | 256W | 130W | 140W | 114W | ||
| Total Current @12V: | 21A | 11A | 12A | 10A | ||
While all of these wattages are miniscule compared to the traction pack capacity, my DC to DC converter is only 30A. If you add in the current draw of the heater blower motor, rear defrost, seat heaters, and other lighting, you pretty quickly approach or exceed its capacity, particularly at night with the high beams and flashers going. That said, with a full complement of LED bulbs running $150 (that's with the fancy 3W Luxeon bulbs for all the 1156es and 1157s), you could also upgrade the DC to DC at that price. But with a pair of conventional bulbs approaching $5, you only need to replace them 4 or 5 times to break even on bulb cost. Plus the lag between, say, applying the brakes and having the brake lights illuminated is all but eliminated.
*I replaced the stock sealed-beam lights with a pair of 7" round Hella H4 housings.
posted by Frank at 7:36 PM
0 comments
![]()
I've often seen advice to the tune of:
Come up with an overall vision or philosophy for the project before you begin. This will help with the countless small decisions you will have to make as you plan and complete the project.
This is something I seem to struggle with on a lot of projects, not just EV-related, and not even just car-related.
There are two areas in which I'm struggling with this, and being something of a perfectionist*, I want to be consistent with whatever route I choose.
So the first question is how true to original the restoration should be: For instance, do I need to locate window seals with a molding groove, or go for the cheaper and more available "Cal look" versions? The second question is more subtle, but basically it boils down to whether I want a more plug-and-play or a more integrated conversion. For instance, do I adjust or replace the torsion bars to correct the ride height, or do I add air shocks? Another instance of this question is how much sheet metal surgery should I do to get the batteries in an optimal location.
Some might advise to take the easy approach to each question, but I've seen some awfully homely restorations and conversions that take this approach. Or one can take the "perfection at all costs" approach, much like my EV conversion role-model, John Wayland. But given real-world constraints on things like time and money, where do I draw the line?
Suggestions are appreciated, and failing that I'll probably follow up with a post of what I've decided. In the mean time, I'm going to take care of the few obvious no-brainer tasks, like fender beading.
*This is coming from a guy who having received a Lego model of a Ferrari Enzo, decided to assemble it so that all the pieces, where possible, had the little "LEGO" text on each button aligned.
posted by Frank at 7:21 PM
1 comments
![]()
posted by Frank at 6:41 PM
1 comments
![]()
posted by Frank at 5:41 PM
1 comments
![]()
posted by Frank at 5:21 PM
0 comments
![]()
posted by Frank at 11:49 AM
0 comments
![]()
posted by Frank at 6:11 PM
0 comments
![]()
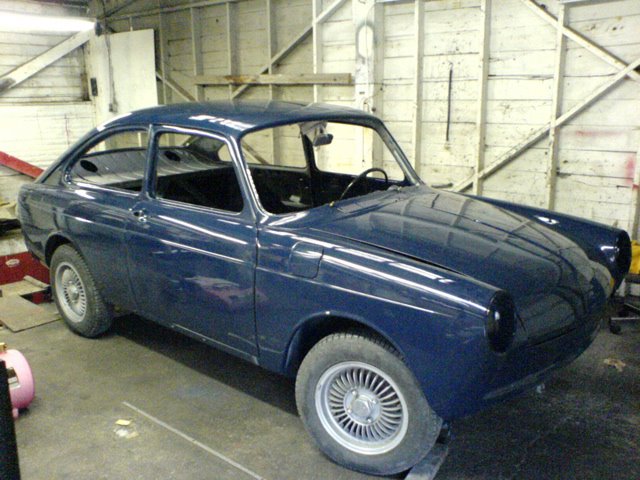
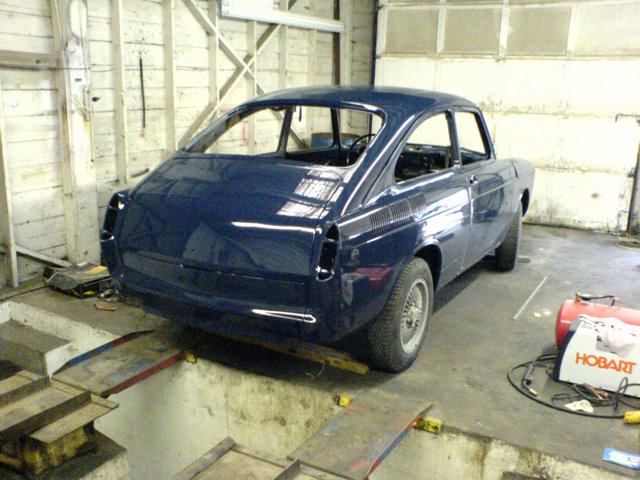
 Thanks to my new camera phone, I now have a few pictures of the "body-in-blue" to show off.
The combination of the CCD in the camera and the fluorescent lighting don't really do the color justice, and it's not helped by the lack of chrome, rubber, or glass to set off the color, but you get the idea.
Thanks to my new camera phone, I now have a few pictures of the "body-in-blue" to show off.
The combination of the CCD in the camera and the fluorescent lighting don't really do the color justice, and it's not helped by the lack of chrome, rubber, or glass to set off the color, but you get the idea.
posted by Frank at 5:40 PM
0 comments
![]()
